Chapter 3: Managing entities and views
For Tetra4D Reviewer, the word “entity” refers to various kinds of information. Some entities are read from the CAD data, like physical parts, annotations, and PMI information. The entities read from the original CAD file flow into a hierarchical list in the Model Tree.
Views combines the visibility of the 3D objects with camera definition, zoom level, and other factors. Views can be saved as configurations.
Entities in 3D documents
The Model Tree positions entities under categories, according to their type. For example, markups and measurements that you create in sessions appear under Annotations. Items read from the CAD file, such as the component parts of an assembly and CAD PMI, appear under Models.
The appearances of the icons in the Model Tree give clues about entity status. Colored icons represent entities that are visible in the document pane. Dimmed icons represent hidden entities. A small funnel on a dimmed icon indicates that the entity is hidden because it is on an inactive layer. You can’t create physical parts in Tetra4D Reviewer, but you can create various other types of entities. For example, annotations and bounding boxes are considered entities, but they aren’t physical parts of an assembly. Typically, you create these types of entities during an analysis or publishing workflow. You can also add selected parts from one document to another by importing or ordinary copying and pasting.
Renaming an entity
1. Right-click the entity in the Model Tree and choose Rename.
2. Type a name, and pressEnter.
Note: You can change entity names by two other methods. You can double-click the name in the Model Tree and type to overwrite the name. Or, you can change it on the General tab of the entity Properties.
Removing entities
You can delete unwanted entities from a document, either temporarily or permanently. All types of entities can be removed.
When you delete an entity temporarily, the entity appears in the Model Tree under the Recycle Bin for that document. Markups and dimensions associated with that entity move automatically to the Recycle Bin. You can restore the entity from the Recycle Bin and then restore its associated markups and dimensions.
Deleting an entity that is already in the Recycle Bin deletes it permanently. If the deleted entity was a physical component of the product assembly, you can import it again from the original source file, if available.
Note: Instead of removing components from a file, you can hide them. The components remain in the session file and can be easily shown again.
Delete entities from a document
1. Select the entities that you want to delete.
2. Click Delete button in HOME tab, to remove the entity and store it in the Model Tree Recycle Bin.
Restore deleted entities
1. Expand the Recycle Bin for the file in the Model Tree panel.
2. Right-click the entity, and choose Restore.
Selecting entities
About selecting entities
An entity is anything in a 3D model that you can select. Selected entities are activated so that you can change their properties, move them, change their visibility, and more.
Tetra4D Reviewer offers advanced selection features, beyond the common clicking techniques. For example, you can select entities that are hidden in the document display.
Select entities manually
• To select visible entities in the document pane, click, Ctrl-click, or hold down Shift and drag a selection box around entities.
• To select entities in the Model Tree, click, Shift-click, and Ctrl-click to select visible and hidden entities. Ctrl-clicks select non-adjacent entities. Shift-clicks select all adjacent entities within a range.
Note: The entities that can be selected in the display area depend on the active Selection Filters.
Selecting entities by attributes
It takes only one step to select all entities that share a trait. For example, you could select all solid entities or all markups. You can also select all the entities in a document in one action.
Selecting all displayed entities
1. Click  in DESIGN REVIEW tab.
 Selecting entities by type
1. Click in VISUALIZATION tab, and choose the wished type.
2. Hold down Ctrl and choose another type again to add a second type to the selection.
Note: The types include Point, Wire, Coordinates System, Planes, Surfaces, and Solids. Dimmed items on the By Type submenu indicate that no entities in the current document correspond to that type.
Selecting entities by layer
The list of layers depends on the layers that were read in the files present in the current document.
1. Click  in VISUALIZATION tab.
2. In the Select a Layer dialog box, select a layer or Ctrl-click to select more than one layer. When you close the dialog box, entities on the selected layers are selected.
Note: The layers that have been created in the CAD application appear in Tetra4D Reviewer session files only if the import options are set to address them.
Selecting entities by color
Use this method to select components that have the same color property.
1. Click  in VISUALIZATION tab.
Note: The Select a Color dialog box shows all the colors in use in the document.
2. Click User Selection to activate the selection process.
3. Select colors:
• Select a part in the document pane to select all parts of that color.
• Select the name of a color in the dialog box to select all parts of that color.
• Select one color in the dialog box and Shift-click another color name to select all parts of all colors in the range.
• Ctrl-click to select multiple color names or multiple parts.
Note: To restart the selection process, click User Selection twice.
Selecting entities by Attribute value
1. Click  in VISUALIZATION tab.
2. Select an attribute in the Attribute list or type the attribute name in the box below the list to jump to that attribute.
• Select an item in the Attributes list.
• Type the name of an attribute in the box below the list.
3. In the Values pane, select a value for that attribute or type the value name to jump to that value.
4. Click Select.
Selecting an entity by a search
You can use the Find feature to search for some kinds of entities, such as physical parts and assemblies, balloons, and annotations.
1.  Click in Visualization tab.
2. In Find What, type part or the full name for the entity.
3. Select any options you want to apply to the search:
• Match Whole Word Only: Ignores occurrences within longer words.
• Ignore Hidden: Ignores entities that are hidden.
•
• Match Case: Ignores occurrences with different capitalization of text.
• Ignore Unloaded: Ignores instances that appear in the Model Tree but that are not currently loaded.
4. Click Find Next or Find All. Found entities are automatically selected.
Note: You can search for CAD-read Product Views and 3D PMIs. The Find feature ignores configuration names, animation actions, and bills of material.
Changing a current entity selection
After you select multiple entities by any process, you can change that selection. You can manually change the selection status of individual entities. You can deselect all entities.
You can also switch the status of all visible entities in one step. This action automatically selects all previously unselected entities and deselects all entities that had been selected.
Editing an entity selection
1. In the document pane or the Model Tree, Ctrl-click each entity that you want to select or deselect.
Deselecting entities
1. Click.  in DESIGN REVIEW tab
 You can also cancel all selections by clicking an empty area of the document pane.
Toggling the selected entities
1. Click  in DESIGN REVIEW tab.
Note: This inversion of selection is independent of the selection filters.
Toggling reverses the selection status of all visible entities. Hidden entities are not affected.
Entity properties
About entity properties
The Properties dialog box contains information about a selected entity or entities. The information comes from one of two sources: the original CAD design file or default information applied by Tetra4D Reviewer. CAD information always takes priority over default information.
Some of the information in the Properties dialog box is read only. Non-interactive information appears with a gray background.
You can change some Properties information for entities. The changes you apply to the selected entities is saved with the session file.
A related dialog box, Physical Properties, has a different function from the Properties dialog box. For example, Physical Properties includes features for making calculations of area, volume, and mass.
These calculations are based on information in the Properties dialog box.
Viewing and editing entity properties
Properties dialog boxes are available for all types of entities.
You can change some entity properties. Most of the editable properties are accessible in the
Color/Material tab. Properties that are dimmed in the dialog box can’t be edited.
1.  In the Model Tree or document pane, select the entity.
2. Click in DESIGN REVIEW tab.
3. Change the properties on each of the four tabs, as needed.
4. Click Apply to apply the change to the entities without closing the Properties and examine the entity appearance in the document pane.
5. Continue adjusting settings, as needed.
6. When you finish, either close the Properties or click Apply and select the next entity that you want to edit.
Note: Configurations, Coordinate Systems, and the file itself do not have Properties dialog boxes. You can open an information display for the file itself by right-clicking the file in the Model Tree and choosing Document Information.
Adding and deleting user-defined materials
Tetra4D Reviewer includes several default material definitions, such as Aluminum, Copper, and Steel. Each material definition incorporates specific density, color qualities, and transparency settings.
When you apply a Material option to an entity, the entity assumes all of the material characteristics. You can define, save, and apply custom materials. These user-defined materials appear on the Properties dialog box Material menu and are saved with the session file.
After you apply a material, you can adjust the settings for that entity. Those changes apply only to the selected entity and do not alter the saved definition for the material. If you want to change the material definition, define a new material with the settings you want and delete the old material.
 The attributes you choose apply only to the selected entities. If you want to make this set of attributes available for future use, create a user-defined material before you close the dialog box. User-defined materials are saved with the session file.
Adding a user-defined material
1.  Select an entity, and click in DESIGN REVIEW tab, and select the Color/Material tab.
2. Specify the Colors, Transparency, and Density settings for the material.
3. Choose User Defined for Material and click the plus sign  .
.4. Type a name for the custom material in the Material Name dialog box, and click OK.
Deleting a user-defined material
1. In the Material pop-up menu on the Color/Material tab, choose the user-defined material that you want to delete.
2. Click the minus sign  .
.Note: The minus sign button is not available for the default materials because they can’t be
deleted.
Edit a user-defined material
Once you create a user-defined material, its properties are permanent and can’t be edited. However,
you can easily define a new material based on the existing material properties.
1.  Select a part and click in DESIGN REVIEW tab.
2.  On the Color/Material tab, select the Material definition that you want to replace, and change the settings, as needed.
3. Click the plus sign , type a name to define the new material, and click OK.
Note:Reusing the name of an existing user-defined material does not overwrite it or alter its settings. Both instances of the name appear on the Material menu until you individually delete them.
4. In Material, select the user-defined material that is now obsolete, and click the minus sign to delete it.
to delete it.Properties options
Four tabs organize the Properties information. Some contain read-only information and some include interactive options.
General tab
• Name: Name of the item, as shown in the Models structure.
• Text area: Descriptions of attributes, if any exist. Look here for information about geometric characteristics and the number of faces, for example.
Color/Material tab
• Material: Options for predefined and user-defined substances, such as copper, steel, and aluminum.
• Simple Color: Limits the available color options to Diffuse.
• Material Colors: Makes options available for individual Diffuse, Ambient, Emissive, and Specular colors and for Shininess.
• Transparency: Sets the opacity of the selected entity. Lower percentages produce more transparent views of the entity. At 0% Transparency, the entity is invisible.
• Density Sets: the physical property for the selected material, using the specified units of weight and volume.
Position tab
• Matrix: Indicates the translation and rotation information for each axis (Tx, Ty, Tz, and Rx, Ry, and Rz in relation to the Tx, Ty, and Tz values).
• Sx, Sy, and Sz: Indicated the values of scaling.
• Restore: Resets position options.
• Is Mirror: Indicates if a symmetry is applied to the entity.
• Is Unit: Indicates if transformations are applied on the entity.
•
Source tab
The Source tab provides information related to the original CAD file. The tab lists the original filename, the design application used to create the file, and the units of measurements.
Changing appearances of entities
Hiding and showing entities
You can change hide or show any individual entities in the document pane. Visibility does not affect the structure of the Model Tree. The Model Tree icons for hidden (invisible) entities become light-gray. Icons for visible entities are gray.
You can change the appearance of entities in several ways:
• Altering visibility by hiding and showing selected entities.
• Adjusting the transparency of selected objects.
• Setting an object to phantom mode.
Isolating an entity
Isolating will hide all unselected objects so that only the selected ones remain visible.
1.  Select the entities that you want to isolate.
2. Click in HOME tab.
Hiding or showing individual entities
1.  Select the entities that you want to hide or show.
2. Click in HOME tab.
 Toggling all entities between hidden and shown
1. Click in HOME tab.
 Displaying all entities
1. Click in HOME tab.
1.
Hiding or showing all annotations by type
 Session annotations are 3D markups and dimensions you create in Tetra4D Reviewer. The context menu Hide/Show command changes the visibility of annotations.
1.  Click in VISUALIZATION tab to hide all PMI markups.
2. Click in VISUALIZATION tab, to hide all dimensions and markups created in Tetra4D Reviewer.
Note: Individually hidden 3D PMIs are dimmed in the data tree. When you choose Hide 3D
PMI, the PMI markup icons aren’t dimmed even though the markups aren’t visible.
Changing the transparency of entities
Changing transparency adjusts the opacity of an entity so that you can see it and see through it.
You can change transparency temporarily, to get a quick glance at the underlying parts or to do other
work. Temporarily transparent objects aren’t selectable.
You can also change the Transparency property. This type of transparency leaves the entity selectable. The entity remains semi-visible until you actively reverse the transparency setting. Phantom mode applies a preset level of transparency to the selected entity. You can’t select an entity that is in Phantom mode.
Note: Phantom mode is a different type of transparency: It is persistent until you actively reverse it and the objects are unselectable.
1.  Select the entities.
2. Click in DESIGN REVIEW tab.
3. On the Color/Material tab, drag the Transparency slider or enter a value for the percentage of transparency.
4. As needed, click Apply and repeat the preceding steps to set other entities at a different percentage of transparency.
5. Click OK to apply the changes and close the Properties dialog box.
Apply transparency temporarily
This technique applies transparency without requiring you to select entities first. While a part is temporarily transparent, it is unselectable. However, you can select other parts, take dimensions, and do other work without reversing the temporary transparency.
1. Move the pointer over the part that you want to make transparent.
2. Press H key.
3. As needed, press H again to make more parts transparent temporarily.
Note: You reverse temporary transparency actions one step at a time by pressing S.
4. Click anywhere in the background to remove the temporary transparency and restore selectability.
1.
Phantom mode
In Phantom mode, selected parts appear semi-transparent and can’t be selected.
You can apply this mode to any geometric entity.
Displaying entities in Phantom mode
1.  Select the parts in the Model Tree or document pane.
2. Click in HOME tab.
Note: The phantom mode remains in effect until you choose View > Phantom again to exit Phantom mode.
 Adding and removing entities from Phantom mode
1. Click in HOME tab.
2. Change the selection, as needed:
a. Ctrl-click to add or remove parts from the current selection.
b.  Click outside the current selection to deselect, and then make a new selection.
3. Click in HOME tab.

 When adding entities to a set of entities that are already displayed in phantom mode, select those entities first. Then choose View > Phantom twice or click the Phantom toolbar
button twice. These actions reapply the phantom mode to both the already displayed in phantom mode entities and to the ones you selected later.
Changing the display mode
1.  Click in VISUALIZATION tab and select the rendering mode among the 4 following renderings:
• Solid: Click  in VISUALIZATION tab, shades in the entire surface area of the parts.
• Solid outline: Click  in VISUALIZATION tab, shades in the entire surface area of the parts and outlines the edges of the parts.
• Wireframe: Click  in VISUALIZATION tab, outlines the edges of the parts.
• Illustration: Click  in VISUALIZATION tab, shows the entire surface area of the parts in flat white and outlines the edges of the parts.
Perspective
1. Click  in VISUALIZATION tab, adjusts Solid, Wireframe, or Illustration mode so that the geometry resembles a physical view.
1.
Accessing the PMIs
The Product Manufacturing Instructions (PMIs) read from CAD files can be numerous and of various types. PMIs are often associated with Product Views read from the CAD files. Product Views appear in a folder under Models in the Model Tree.
Product Views are like Configurations that you define and save in Tetra4D Reviewer. A Product View sets the orientation, zoom level, and visibility of the 3D objects and 3D PMI markups.
Views created in CAD can also be associated with the 2D environment, as views defined in a drawing.
 Activating a PMI Product View
1. Click in VISUALIZATION tab opens the following dialog:
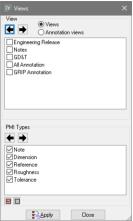
2. Select Views or Annotation Views (if available).
3. Under PMI Types, select the types of PMI markups you want to show: Notes and References (if available).
4. Under View, select the view you want to see:
5. Click the arrows to step through the list, which automatically applies each Product View as you progress.
6. Click a check box to select a view, and click Apply.
7. Close the Views window.
Note: You can select or deselect all PMI Types with the Select All  and Unselect All
 buttons.
and Unselect All buttons.Moving parts and assemblies
About moving components
You can change the positions of individual parts and assemblies in the document. This feature is especially useful if parts from different source files appear superimposed at the same location. The new positions are associated with the currently active configuration. When you switch to a different configuration, moved parts appear in their original positions. When you reactivate the configuration with the moved parts, they jump back into their moved locations.
Note: You can move all parts simultaneously in different directions by creating an exploded view. Exploded views can also be saved as part of a configuration.
Activating the “Drag and Drop” displacement control
1. If a locked configuration is active, switch to an unlocked one or create a new configuration.
2.  Select the parts to be moved.
3. Click in DOCUMENTATION tab.
Note: The displacement manipulator appears around the selected parts.
4. Use the manipulator to move the parts as described below.
Moving parts freely with direct displacement controls
1. Click the yellow dot that appears in the center of the manipulator.
2. Without pressing the mouse button, slide the manipulator to move the selected parts in any direction.
3. Click once to release the parts in this new position.
Moving parts along axes
1. Click one axis of the manipulator.
2. Without pressing the mouse button, slide the manipulator along the direction of the arrow.
Note: As you slide the pointer, a small box displays the value of the displacement along the axis.
3. Click once to release the parts in this new position.
4. As needed, continue to move and rotate the parts using the other activated controls.
Rotating parts along axes
1. Click one rotation arrow of the manipulator.
2. Without pressing the mouse button, slide the pointer around within the visible circle to rotate the part.
Note: As you slide the pointer, a small box displays the angle (in degrees) between the original position and the rotated position.
3. Click once to release the parts at the rotated position.
4. As needed, continue to move and rotate the parts using the other activated controls.
1.
Moving parts with the Move feature
You can define displacements through several methods available in the Move controls window. The Move feature is available only when an unlocked configuration is active.
 As you work with the Move feature, notice the text area near the bottom of the window. This area displays context-sensitive information about actions that are required as you complete steps in the process.
1.  If necessary, activate a new or an existing unlocked configuration.
2. Click in DOCUMENTATION tab to activate the feature
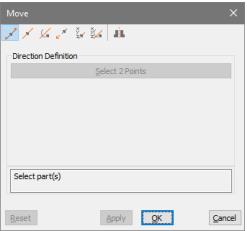
3. Select a method at the top of the Move controls dialog.
4. In the Direction Definition area, select a Method if available: Main CS, 2 Points, Edge, or Plane.
5. Drag the Displacement slider or type a value to set the displacement value
Note: If you aren’t satisfied with your selections, click Reset to start over from the original position.
6. When you are satisfied with the position change, continue working:
• Click Apply to save the results, and continue to move other parts.
• Click OK to save the results and close the Move controls window.
Methods to move parts