Upload content to containers
The content in the app is uploaded and managed in the TechCommCloud.
Manual uploads of documents in the TechCommCloud
Log in to the web portal under http://techcommapp.com/api/login with your customer ID and your password.
After login into the cloud, you will be in a channel. The channel is a client-specified management board (dashboard) for the administrator for documents, users. profile and possibly existing sub folders (categories).
A) To upload a document, click on "Start new document". Now, determine the document name and choose whether the document will be in the public or private section.
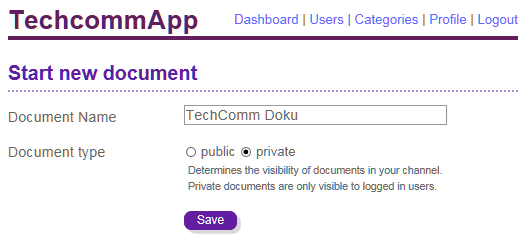
Now click on "Save" to create an empty container in the dashboard.
In the document list, the document name appears with its unique document ID.
B) Drop new documents:
As of the basic version 3.2, the drag and drop function enables to relocate the ready zip container or PDF to the window or to browse the file directory via "drop ZIP or PDF files". By clicking on "Save documents" the file is saved.
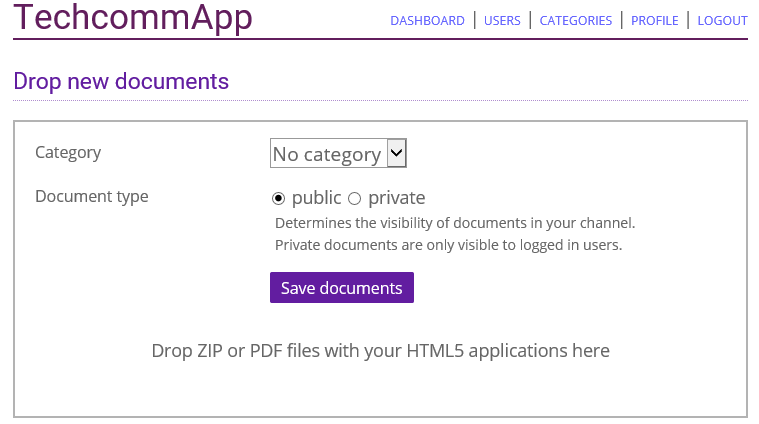
1. Click on the button "Drop new documents".
2. Relocate the zip file via drag & drop to the site and set the "Document type" to "Public".
3. After clicking on "Save", choose the newly created document in the dashboard and click on "Edit".
4. Change the file name and add a thumbnail, which is to be displayed in the channel for this document.
5. Click on "Save".
In the document list in the dashboard, the file name now appears, which can be further edited by clicking on "Edit", e. g. changing the document name, upload a thumbnail, define public and private or categories, etc.
Edit your document
Choose "Edit" to start the manual upload of the document. Choose a preview image (thumbnail 450x450 px) with the thumbnail upload for this documentation.
This graphic now appears in the document list in the dashboard and in the app as preview. It makes it easier to differentiate it from other documents.
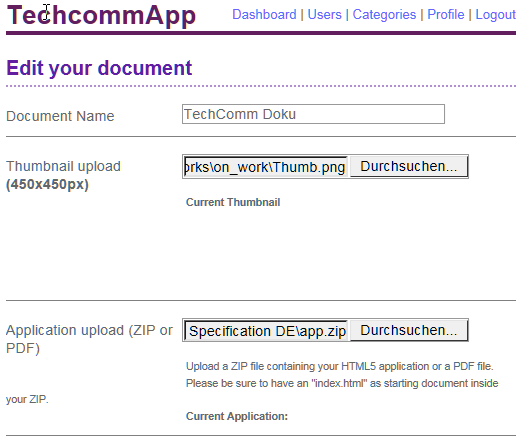
With Application ZIP upload, you can add the zip files which are archived in the overall output. The difference between public and private can be changed at any time.
More functions “edit your document”
In edit your documents there are more functions available.
Edited documents, new thumbnails and additional topic brands can be updated at any time in the dashboard by clicking on "Edit" again. In the document list, you can check the HTML output at any time. There, you can create the QR code for the document and the QR code for the target (topic). In addition, you can save the output by downloading the zip file.
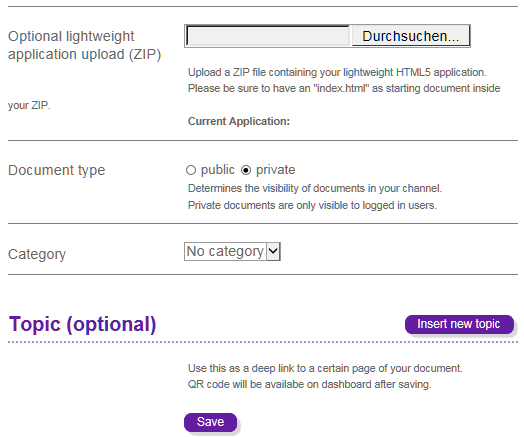
• Optional Lightweighting application upload
This upload is intended to upload an output from the CMS system. The advantage is that the content includes notes to external pages. Therefore, video files, PDF attachments or other notes do not have to be uploaded separately, which in turn reduces the amount of data considerably.
This upload is intended to upload an output from the CMS system. The advantage is that the content includes notes to external pages. Therefore, video files, PDF attachments or other notes do not have to be uploaded separately, which in turn reduces the amount of data considerably.
• Document
You can change the type of document to public or private whenever you edit a document.
You can change the type of document to public or private whenever you edit a document.
• Category
A category, i. e. a sub folder, can be chosen for the current document if a category has been defined beforehand.
A category, i. e. a sub folder, can be chosen for the current document if a category has been defined beforehand.
• Insert new topic
Topic means that a defined target in the source file was defined, which gives you the opportunity to directly go to the target. If a target exists and the respective syntax and topic is set, you can directly go to the target passage in the document.
Topic means that a defined target in the source file was defined, which gives you the opportunity to directly go to the target. If a target exists and the respective syntax and topic is set, you can directly go to the target passage in the document.
Automatic Upload
For the Enterprise version, an API (Application Programming Interface) is available, which enables an automatic upload from the content management system or another environment (CloudDrafts, iiRDS, …).
1. Log in to the web portal under http://techcommapp.com/api/login with your customer ID and your password.
2. Click on the button "Drop new documents".
3. Drag the zip file via drag & drop to the page and set the "Document type" to "Public".
4. After clicking on "Save", choose the newly created document from the dashboard and click on "Edit".
5. Change the file name and add a thumbnail, which is to be displayed for this document in the channel.
6. Click on "Save".
Last modified date: 07.20.2018