• Direction Definition
• Main CS Moves along the active axis of the active coordinates system.
• 2 Points Sets the direction by two points that you select. The Accept/Reject pointer  appears as you select points so that you can confirm the position or toggle to another possible location.
•
• Edge Sets the direction parallel to an edge that you select in the document.
• Plane Sets the direction perpendicular to a plane that you select in the document. (Not available for Move On Helix actions.).
• Select Direction When highlighted, shows that the selection process is active. You can click Select Direction to deactivate and restart the selection process. (Not available when Main CS is selected.)
• Reset Sets all options back to the default values.
• Step value The Step value controls the number of intermediate positions shown when you play the animation. Smaller step values show more intermediate positions.
• Reverse Path (Available for Move On Curve.) Changes the direction of movement along the curve.
• Keep Parallel (Available for Move On Helix and Move On Curve.)
Note: When Keep Parallel is selected, the orientation of the parts is always parallel to their original orientation. This type of rotation compares to a human hand sliding in circles on a flat surface. The hand always points in the same direction.
When Keep Parallel is deselected, the selected parts stay oriented to the center of rotation as they move. This type or rotation compares to a passenger airplane circling around an airport at constant altitude. The plane constantly changes its orientation to align with the circumference of the circle.
• Hide and Show (Available for Hide/Show.) Sets the visibility of the selected parts for the current action. The visibility state applies to all intermediate actions until you change it again in a later action.
•
Playing an animation
1.  In the Model Tree, apply and expand the configuration with the animation.
2. Click in DOCUMENTATION tab
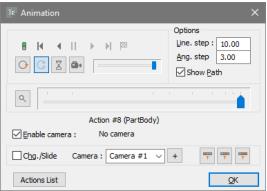
3. Set the starting point for the animation:
• Drag the long action slider in the middle of the Animation controls window.
• Click Go To Start  or Go To End
 .
or Go To End .• Click Previous Action  or Next Action
 to progress through actions one step at a time.
or Next Action to progress through actions one step at a time.4. Drag the smaller slider to set the animation speed.
5. Select automatic pause options:
• To play in continuous loops without pauses, select Repeat Simulation  .
.• To play forward and then backward in continuous loops without pauses, select Auto Reverse  . (Available only when Repeat Simulation is selected.)
• To pause at the end of each action, select Auto Pause  .
.6. Set the camera option:
• To play entirely from the default point of view, deselect Enable Camera.
• To show assigned changes in the point of view, select Enable Camera.
7.  Play the animation, either by dragging the action slider or by selecting Play Forward
 or Play Backward .
Play the animation, either by dragging the action slider or by selecting Play Forward or Play Backward .Note: The Chg./Slide option determines whether or not the camera changes appear when you drag the animation slider.
Options for playing animations
• Line. Step Controls the default speed at which linear displacements play. Smaller values move the selected parts by smaller fractions of the total displacement, which slows the movement during playback. The linear step value applies only to actions without custom Step values.
• Ang. Step Controls the default speed at which rotations play. Smaller steps rotate the selected parts by smaller angles, slowing the movement during playback. The angular step value applies only to actions without custom Step values.
• Show Path Toggles the visibility of a line and dots indicating the travel positions of parts for each action.
• Show Current Action Slider button  Toggles what the main slider shows: global actions (the entire animation sequence) or individual actions (the current action only).
Defining cameras for an animation
A camera sets the view at a specific orientation and zoom level. You can define cameras that change the point of view as an animation plays. Camera changes in an animation make smooth transitions as they shift from one point of view to another.
 After you define custom cameras in the Play Animation window, you can apply them to the actions in the animation. You can edit the camera assignments after you make them. You can play animations with the camera disabled, so the action appears from a constant point of view.
1. In the Model Tree, activate the configuration with the animation, and click in DOCUMENTATION tab.
2. Select Enable Camera.
3. Using the 3D Controls tools, set the orientation and zoom level for the camera.
4. Click Add Camera  .
.5. Repeat the process, as needed, to add more cameras.
The camera is automatically named Camera #x, where x represents the order in which you created it.
Cameras can’t be edited, renamed, or removed from the menu.
 Applying cameras to actions
1. In the Model Tree, activate the configuration with the animation, and click in DOCUMENTATION tab.
2. Select Enable Camera, and click Action List.
3. Activate an action in the Action List in any of these ways:
• Drag the action slider.
• Click Go To Start or Go To End .
or Go To End .• Click Previous Action or Next Action to progress through actions one step at a time.
or Next Action to progress through actions one step at a time.Note: Be careful to use these controls to navigate to the action you want to see. Merely highlighting the action in the Action List does not activate the selected action.
4. Choose a camera from the Camera menu, and apply that camera:
• To apply the camera to only the currently selected action, click Define Camera For Current Action  .
.• To apply the camera to all actions before the selected action, click Define Camera For Previous Actions  .
.• To apply the camera to the selected action and all later actions, click Define Camera For Current Action And Next Actions  .
.5. Continue activating actions and applying cameras, as needed.
Note: You can apply a specific camera to several actions or apply a different camera to each action. You can also apply a mixture of No Camera and custom cameras.
Note: The Chg./Slide option enables camera changes when you drag the action slider. By default, Chg./Slide is deselected, which prevents changes in the point of view when you drag the action slider .
Editing an animation
Animations fall under configurations in the Model Tree. To edit an animation, it’s important that you
activate the appropriate configuration first.
Adding actions to an existing animation
 Adding actions simply continues the process you used to create the original animation. To review those steps and options.
1. Click in DOCUMENTATION tab.
2. Select an action type, parts, and options, and click Apply.
Note: The new actions are added to the end of the animation sequence, as shown in the Model Tree structure of the animation.
Changing the sequence of actions
 Changing the sequence can be especially useful for Explode animations. You can change the order in which parts move out from the center. You can also intersperse other actions, such as changing the visibility of individual parts.
1. Click in DOCUMENTATION tab.
2. Select Action List to expand the Animation controls window.
3. Select an action in the list and select changes that you want to apply:
• Move Up  and Move Down
 buttons Changes the sequence of a selected action in the Action List.
and Move Down buttons Changes the sequence of a selected action in the Action List.• Group Actions  Groups the selected actions so that they play simultaneously.
• Ungroup Actions  Removes the selected actions from any groups in which they were included.
• Remove Action  Deletes the selected action from the animation.
•
Note: Although you can directly rearrange or delete actions in the Model Tree, using the Action List is the preferred method. The advantage of using the Action List is that you can immediately check results by playing the animation with the slider or play controls.
Editing options for individual actions
1. Right-click the action inthe Model Tree or the actionpath in the document pane, and choose Edit Action.
Note: Thepathsof fallactionsappearinthedocumentpane. Yellowarrows, greenendpoints, and step numbersappear for stepsthat can be lengthened or shortened.
2. Make changes available for the action, as needed:
• Type a new name for the action.
• Drag the slider or type a value to change the displacement.
• Type a new Step value.
• Select or deselect Keep Parallel.
Note: You can also drag the yellow arrows, endpoints, or X, Y, and Z arrows for an action to make changes in the document pane. The displacement value in Edit Action updates as you drag.
3. Click Apply.
4. Select another action in the animation:
• Select the action in the Model Tree.
• Select the yellow arrow or path of the action in the document pane.
5. Change the action, as needed, and click Apply.
6. Continue selecting, changing, and applying new options to other actions, as needed.
Note: If you select another action without clicking Apply, any changes you made to the previously selected action revert to their previous settings.
Adding or removing parts to an action
1. Right-click the action in the Model Tree or the action path in the document pane, and choose Edit Action.
2. In the document pane or Model Tree, select the parts you want to add.
3. Right-click the selection and choose Add Geometry or Remove Geometry.
4. Click APPLY.
Grouping and ungrouping actions
Grouped actions occur simultaneously. Actions can be grouped only when they have no common part.
1. Select the actions in the Model Tree.
2. Right-click the selection and choose a command:
• To group the selected actions, choose Group Actions.
• To remove the selected actions from an existing group, choose UnGroup Actions.
•